Difference between revisions of "Pc Connection/it"
(Created page with "Connessione al PC") |
L.leonardi (talk | contribs) |
||
| (14 intermediate revisions by 3 users not shown) | |||
| Line 1: | Line 1: | ||
| − | + | {{Language bar}} | |
| − | {{DISPLAYTITLE:Scanner's connection}} | + | {{DISPLAYTITLE:Scanner's connection|noerror}} |
| − | == | + | ==Connettere lo Scanner== |
| − | + | Come mostrato nelle immagini, nella parte posteriore dello scanner ci sono, da sinistra a destra, l'interruttore della corrente, la presa di corrente, la porta HDMI e la porta USB: | |
| − | |||
| − | + | {{Big image|Big.png}} | |
| − | ''Scanner | + | ''Connessione Scanner Big/Deluxe'' |
| − | + | {{Big image|Small.png}} | |
| − | ''Scanner | + | ''Connessione Scanner Small'' |
| − | + | Il cavo di corrente è standard a 230V e deve essere connesso a una linea elettrica che possa mantenere il voltaggio durante tutte le fasi di lavoro e che sia protetta da sovraccarichi e corto circuiti.<br /> Il cavo HDMI deve essere connesso al Computer utilizzando la porta HDMI corrispondente alla Scheda Grafica. La posizione di tale porta può variare a seconda della marca e del modello del Computer stesso. Nei Computer da noi forniti, Alienware i5 e i7 della Dell, questa porta HDMI si trova in basso a sinistra: | |
| − | |||
| − | |||
| − | [[File:Pc.png]] | + | [[File:Pc.png]] |
| − | + | La connessione del cavo USB dipende dal modello di scanner. Infatti, i modelli Easy e Smart (sia Big che Small) montano componenti USB 2.0, mentre il modello Deluxe, monta componenti USB 3.0. I cavi USB degli scanner Easy e Smart vanno dunque inseriti in porte USB 2.0, mentre il cavo del Deluxe va inserito in una porta USB 3.0. Le porte USB in genere seguono un codice a colori per essere facilmente disinguibili: le porte 2.0 sono nere mentre le 3.0 sono blu. Sebbene il cavo USB fornito da Open Technologies per connettere lo scanner al Computer è un cavo con USB 3.0 (blu), le precedenti istruzioni rimangono valide, quindi per i modelli Easy e Smart il cavo andrà collegato a una porta usb 2.0. | |
| − | |||
| − | Deluxe | ||
| − | Smart | ||
| − | |||
| − | |||
| − | |||
| − | 3.0 | ||
| − | |||
| − | |||
Latest revision as of 14:44, 26 January 2016
Connettere lo Scanner
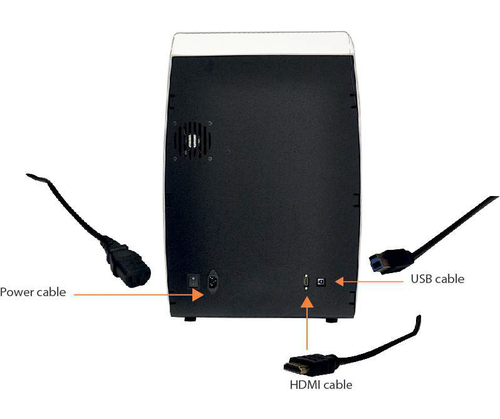
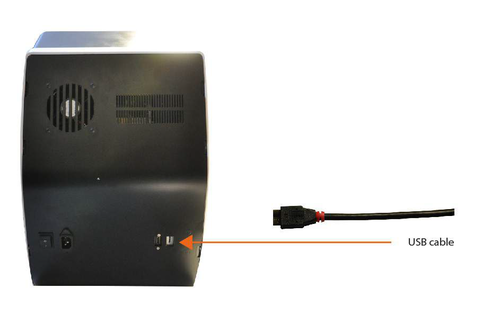
Come mostrato nelle immagini, nella parte posteriore dello scanner ci sono, da sinistra a destra, l'interruttore della corrente, la presa di corrente, la porta HDMI e la porta USB:
Connessione Scanner Big/Deluxe
Connessione Scanner Small
Il cavo di corrente è standard a 230V e deve essere connesso a una linea elettrica che possa mantenere il voltaggio durante tutte le fasi di lavoro e che sia protetta da sovraccarichi e corto circuiti.
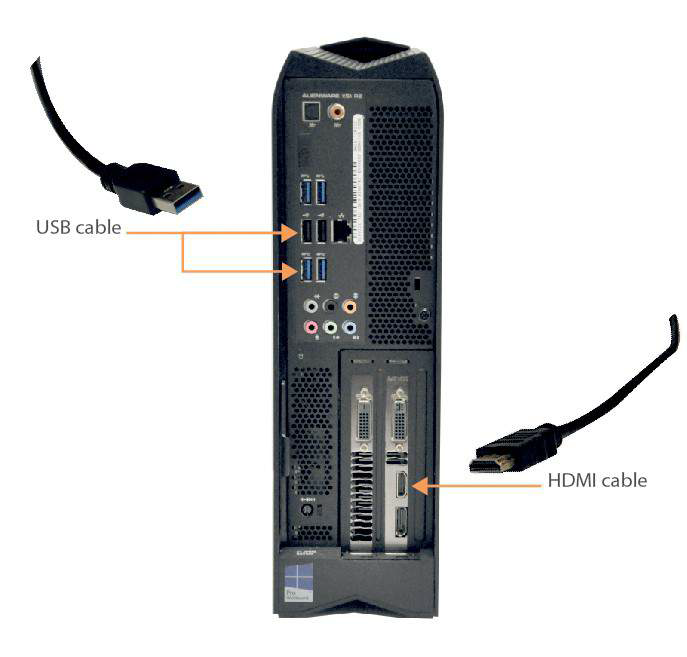
Il cavo HDMI deve essere connesso al Computer utilizzando la porta HDMI corrispondente alla Scheda Grafica. La posizione di tale porta può variare a seconda della marca e del modello del Computer stesso. Nei Computer da noi forniti, Alienware i5 e i7 della Dell, questa porta HDMI si trova in basso a sinistra:
La connessione del cavo USB dipende dal modello di scanner. Infatti, i modelli Easy e Smart (sia Big che Small) montano componenti USB 2.0, mentre il modello Deluxe, monta componenti USB 3.0. I cavi USB degli scanner Easy e Smart vanno dunque inseriti in porte USB 2.0, mentre il cavo del Deluxe va inserito in una porta USB 3.0. Le porte USB in genere seguono un codice a colori per essere facilmente disinguibili: le porte 2.0 sono nere mentre le 3.0 sono blu. Sebbene il cavo USB fornito da Open Technologies per connettere lo scanner al Computer è un cavo con USB 3.0 (blu), le precedenti istruzioni rimangono valide, quindi per i modelli Easy e Smart il cavo andrà collegato a una porta usb 2.0.


