Difference between revisions of "Pc Connection"
(Created page with "<languages/> {{DISPLAYTITLE:Scanner's connection}} <translate> == Connect the Scanner == As you can see in the following pictures, on the back of the scanner there are, fro...") |
|||
| (9 intermediate revisions by 4 users not shown) | |||
| Line 1: | Line 1: | ||
| − | + | {{Language bar}} | |
| − | {{DISPLAYTITLE:Scanner's connection}} | + | {{DISPLAYTITLE:Scanner's connection|noerror}} |
<translate> | <translate> | ||
| − | == Connect the Scanner == | + | == Connect the Scanner == <!--T:1--> |
| + | <!--T:2--> | ||
As you can see in the following pictures, on the back of the scanner there are, from left to right, the | As you can see in the following pictures, on the back of the scanner there are, from left to right, the | ||
power switch, the power cable port, the HDMI port and the USB port: | power switch, the power cable port, the HDMI port and the USB port: | ||
| − | + | <!--T:3--> | |
| + | {{Big image|Big.png}} | ||
| + | <!--T:4--> | ||
''Scanner's connection Big/Deluxe'' | ''Scanner's connection Big/Deluxe'' | ||
| − | + | <!--T:5--> | |
| + | {{Big image|Small.png}} | ||
| + | <!--T:6--> | ||
''Scanner's connection Small'' | ''Scanner's connection Small'' | ||
| + | <!--T:7--> | ||
The power cable is an average 230V cable and must be connected to a power line that | The power cable is an average 230V cable and must be connected to a power line that | ||
| − | can hold such | + | can hold such voltage in all phases of work and that is protected from overloads and |
| − | short-circuits. <br/> The HDMI cable must be connected to the Computer in | + | short-circuits. <br/> The HDMI cable must be connected to the Computer, in the Graphic Card's HDMI port. The location of this port in the computer may vary according to the Computer's brand and model. In the Computers we provide, Dell's Alienware i5 and i7, this HDMI port is on the bottom-left side: |
| − | [[File | + | <!--T:8--> |
| + | [[File:dell01.png]] | ||
| − | The connection of the USB cable depends on the model of the scanner | + | <!--T:9--> |
| − | Easy and Smart models (both | + | The connection of the USB cable depends on the model of the scanner, as |
| − | Deluxe model | + | in the Easy and Smart models (both Small and Big) there are USB 2.0 components, whereas in the |
| − | Smart Scanners must be plugged in a port USB 2.0 and the USB cable of the Deluxe must | + | Deluxe model there are USB 3.0 components. Therefore, the USB cable of Easy and |
| − | be connected to a port USB 3.0. | + | Smart Scanners must be plugged in a port USB 2.0 and the USB cable of the Deluxe model must |
| + | be connected to a port USB 3.0. These ports are usually colour-coded, so it's possible to | ||
recognise the 2.0 because of its black colour and the 3.0 because of its blue colour. | recognise the 2.0 because of its black colour and the 3.0 because of its blue colour. | ||
| − | The USB cable Open Technologies provides to connect the scanner to the Computer is a | + | The USB cable that Open Technologies provides to connect the scanner to the Computer is a |
| − | 3.0 USB cable (blue), | + | 3.0 USB cable (blue), however the above-mentioned instructions remain valid and |
even though the cable is 3.0, if the scanner is an Easy or Smart model it must be plugged | even though the cable is 3.0, if the scanner is an Easy or Smart model it must be plugged | ||
in a USB 2.0. | in a USB 2.0. | ||
Latest revision as of 10:30, 28 May 2018
Connect the Scanner
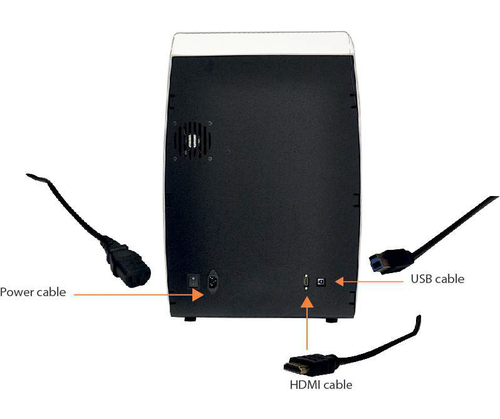
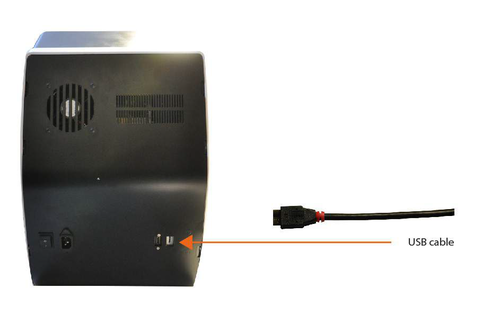
As you can see in the following pictures, on the back of the scanner there are, from left to right, the power switch, the power cable port, the HDMI port and the USB port:
Scanner's connection Big/Deluxe
Scanner's connection Small
The power cable is an average 230V cable and must be connected to a power line that
can hold such voltage in all phases of work and that is protected from overloads and
short-circuits.
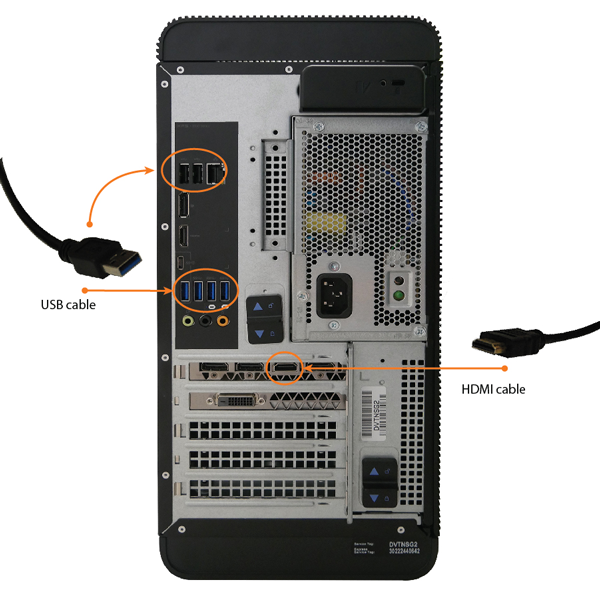
The HDMI cable must be connected to the Computer, in the Graphic Card's HDMI port. The location of this port in the computer may vary according to the Computer's brand and model. In the Computers we provide, Dell's Alienware i5 and i7, this HDMI port is on the bottom-left side:
The connection of the USB cable depends on the model of the scanner, as in the Easy and Smart models (both Small and Big) there are USB 2.0 components, whereas in the Deluxe model there are USB 3.0 components. Therefore, the USB cable of Easy and Smart Scanners must be plugged in a port USB 2.0 and the USB cable of the Deluxe model must be connected to a port USB 3.0. These ports are usually colour-coded, so it's possible to recognise the 2.0 because of its black colour and the 3.0 because of its blue colour. The USB cable that Open Technologies provides to connect the scanner to the Computer is a 3.0 USB cable (blue), however the above-mentioned instructions remain valid and even though the cable is 3.0, if the scanner is an Easy or Smart model it must be plugged in a USB 2.0.


