Difference between revisions of "Interaction/pt-br"
(Updating to match new version of source page) |
|||
| (4 intermediate revisions by one other user not shown) | |||
| Line 5: | Line 5: | ||
== Vista Principal == | == Vista Principal == | ||
| − | Aqui abaixo é apresentado um exemplo de interação 3D em uma | + | Aqui abaixo é apresentado um exemplo de interação 3D em uma mesh selecionada no OpticalRevEngDental. |
{{Screenshot|Dental_3_5_interactor.JPG}} | {{Screenshot|Dental_3_5_interactor.JPG}} | ||
| Line 29: | Line 29: | ||
* {{Inline button|Key_shift.png}} + Number from 1 to 7 : change the 3D View to one of the default positions (E.g. Frontal, Back, Top, etc.) | * {{Inline button|Key_shift.png}} + Number from 1 to 7 : change the 3D View to one of the default positions (E.g. Frontal, Back, Top, etc.) | ||
| − | + | Nas opções de software, é possível ativar um modo de "Interação Alternativa", que permite trocar o '' botão do meio do mouse '' e o '' botão direito do mouse '', a fim de estabelecer uma interação mais parecida com outro software CAD. | |
| + | |||
| + | In case the user has a 3D Mouse, the interaction depends on the specific 3D Mouse commands. | ||
| + | |||
| + | ===Touchscreen monitor Interaction=== | ||
| + | |||
| + | To interact with the software using a touchscreen monitor: | ||
| + | |||
| + | * Touch the image with two fingers to zoom in or out; | ||
| + | * Touch the image with three fingers to rotate the view. | ||
=== Menu Contexto e Menu Vista === | === Menu Contexto e Menu Vista === | ||
| Line 35: | Line 44: | ||
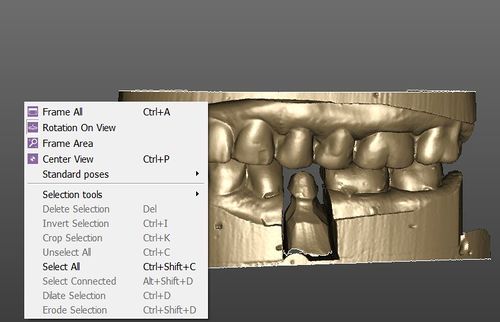
O menu vista e no menu Vista 3D contexto contêm algumas ferramentas que podem ser usadas para interagir com o Vista 3D. | O menu vista e no menu Vista 3D contexto contêm algumas ferramentas que podem ser usadas para interagir com o Vista 3D. | ||
| − | * ''' | + | * '''Enquadrar Todos''' ({{Inline button|Key_ctrl.png}} + A) : a câmera 3D se deslocara para mostrar, na tela, todos os objetos 3D atualmente selecionados |
| − | * ''' | + | * '''Rotação Em Vista''' : Se essa opção for ativada, a rotação irá ignorar os objetos 3D atualmente selecionados; se ele estiver desativado, o centro da rotação será o baricentro dos objetos 3D selecionados |
| − | * ''' | + | * '''Ferramenta Área Enquadrada''': esta ferramenta permite desenhar com{{Inline button|Mouse_left.png}} um retângulo. O retângulo vai se tornar a nova visão da câmera. |
| − | * ''' | + | * '''Vista Central''' ({{Inline button|Key_ctrl.png}} + P) : os objetos 3D atualmente selecionados são movidos no centro da tela sem alterar o seu Zoom. |
| − | * ''' | + | * '''Pose Padrão ''' : sub-menu para aplicar vistas 3D padrão : |
| − | ** ''' | + | ** '''Frente''' ( {{Inline button|Key_alt.png}} + 1) |
| − | ** ''' | + | ** '''Trás''' ( {{Inline button|Key_alt.png}} + 2) |
| − | ** ''' | + | ** '''Topo''' ( {{Inline button|Key_alt.png}} + 3) |
| − | ** ''' | + | ** '''Embaixo''' ( {{Inline button|Key_alt.png}} + 4) |
| − | ** ''' | + | ** '''Esquerda''' ( {{Inline button|Key_alt.png}} + 5) |
| − | ** ''' | + | ** '''Direita''' ( {{Inline button|Key_alt.png}} + 6) |
O menu de contexto contém outras ferramentas descritas na [[Man_DataEditing|Data Editing]] página. | O menu de contexto contém outras ferramentas descritas na [[Man_DataEditing|Data Editing]] página. | ||
| Line 57: | Line 66: | ||
This window provides some information about the current selected 3D Objects. | This window provides some information about the current selected 3D Objects. | ||
| − | * ''' | + | * '' 'Descrição' '': uma linha que descreve o tipo dos objetos atualmente selecionados (por exemplo Mesh de Triângulos: 2, Gama Imagens: 6, etc.) |
| − | * ''' | + | * '' 'Pontos' '': o número de pontos dos objetos atualmente selecionados |
| − | * '''Faces''': | + | * '' 'Faces' '': o número de faces, disponível apenas para meshes triangulares |
| − | * '''Selected''': | + | * '' 'Selected' '': o número de pontos selecionados / faces dos objetos atualmente selecionados |
| − | * ''' | + | * '' 'Tamanho e posição' '': as coordenadas mínima/máximas do volume dos objetos atualmente selecionados, e seu tamanho em todas as direções |
{{Navigation|Interface|Project Tree}} | {{Navigation|Interface|Project Tree}} | ||
Latest revision as of 09:30, 11 October 2017
Contents
Vista Principal
Aqui abaixo é apresentado um exemplo de interação 3D em uma mesh selecionada no OpticalRevEngDental.
É possível interagir com a visualização em 3D usando o mouse e o teclado, o menu de contexto, o menu de vista e a barra de ferramentas de exibição.
Interação Mouse
The user can interact with the orientation of the 3D object through either the use of the mouse or more specific tools that can be selected in the View menu, the View toolbar or the Context menu.
Here below, find a list of the provided mouse/keyboard combinations:
-
 +
+  or
or  +
+  : pan the camera in 2D
 -
 : freely rotate the camera around the 3D Object
 -
 +
+  : rotate the camera restricted to the Y axis of the 3D View
 -
 +
+  : rotate the camera restricted to the X axis of the 3D View
 -
 +
+  : rotate the camera restricted to the Z axis of the 3D View
 -
 : change Zoom
 -
 : enter the context menu
 -
 +
+  : change the position of the light source in the 3D View
 -
 : use the current tool (E.g. Rectangular Selection, Hole Filling, etc.)
 -
 +
+  : invert the current tool if available (E.g. Deselect points instead of Select points, etc.)
 -
 + Number from 1 to 7 : change the 3D View to one of the default positions (E.g. Frontal, Back, Top, etc.)
Nas opções de software, é possível ativar um modo de "Interação Alternativa", que permite trocar o botão do meio do mouse e o botão direito do mouse , a fim de estabelecer uma interação mais parecida com outro software CAD.
In case the user has a 3D Mouse, the interaction depends on the specific 3D Mouse commands.
Touchscreen monitor Interaction
To interact with the software using a touchscreen monitor:
- Touch the image with two fingers to zoom in or out;
- Touch the image with three fingers to rotate the view.
Menu Contexto e Menu Vista
O menu vista e no menu Vista 3D contexto contêm algumas ferramentas que podem ser usadas para interagir com o Vista 3D.
- Enquadrar Todos (
 + A) : a câmera 3D se deslocara para mostrar, na tela, todos os objetos 3D atualmente selecionados
 - Rotação Em Vista : Se essa opção for ativada, a rotação irá ignorar os objetos 3D atualmente selecionados; se ele estiver desativado, o centro da rotação será o baricentro dos objetos 3D selecionados
- Ferramenta Área Enquadrada: esta ferramenta permite desenhar com
 um retângulo. O retângulo vai se tornar a nova visão da câmera.
 - Vista Central (
 + P) : os objetos 3D atualmente selecionados são movidos no centro da tela sem alterar o seu Zoom.
 - Pose Padrão : sub-menu para aplicar vistas 3D padrão :
O menu de contexto contém outras ferramentas descritas na Data Editing página.
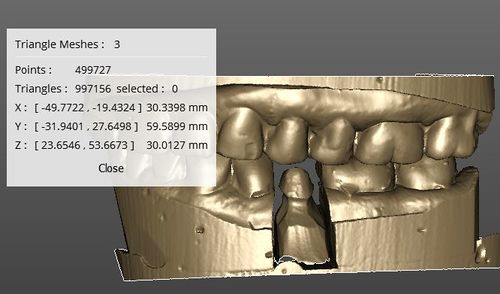
Janela de Informações de Dados
No menu Vista, é possível permitir que a Janela de Informações de Dados com o Janela de Dados Vista (![]() +
+ ![]() + I) ação.
+ I) ação.
This window provides some information about the current selected 3D Objects.
- 'Descrição' : uma linha que descreve o tipo dos objetos atualmente selecionados (por exemplo Mesh de Triângulos: 2, Gama Imagens: 6, etc.)
- 'Pontos' : o número de pontos dos objetos atualmente selecionados
- 'Faces' : o número de faces, disponível apenas para meshes triangulares
- 'Selected' : o número de pontos selecionados / faces dos objetos atualmente selecionados
- 'Tamanho e posição' : as coordenadas mínima/máximas do volume dos objetos atualmente selecionados, e seu tamanho em todas as direções


