Difference between revisions of "Wiz Acquisition/zh-hant"
Democenter (talk | contribs) (Created page with "===進階參數===") |
(Importing a new version from external source) |
||
| (22 intermediate revisions by 2 users not shown) | |||
| Line 1: | Line 1: | ||
{{Language bar}} | {{Language bar}} | ||
{{DISPLAYTITLE:Wizard Acquisition|noerror}} | {{DISPLAYTITLE:Wizard Acquisition|noerror}} | ||
| − | = | + | = 采集向导 = |
| − | + | 在分步向导流程中,您可以:在一次扫描采集单个或多个对象,重新采集先前采集的对象,并整合所有这些采集。 | |
| − | == | + | ==单个对象== |
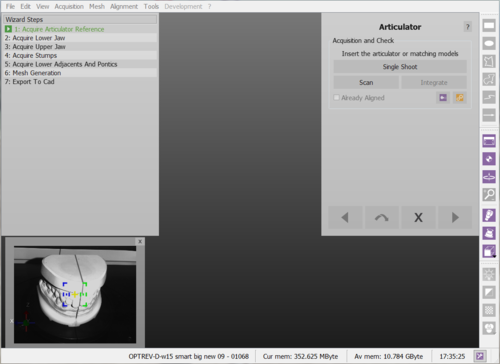
| − | + | 每采集一个元素,都会显示一个特定的向导屏幕: | |
| − | * | + | * 被采集对象的名称 |
| − | * | + | * 应扫描对象的简要说明 |
| − | * | + | * 一个''对象颜色''选择器 |
| − | * | + | * 一个''扫描''按钮以开始采集 |
| − | * | + | * 一个''整合''按钮以开始整合之前扫描的对象 |
| − | * | + | * 一个''已对齐''检查显示该对象是否已对齐项目的其余部分 |
| − | + | 遵循向导很容易: | |
| − | # | + | # 阅读对象说明 |
| − | # | + | # 把合适的对象置入扫描器内 |
| − | # | + | # 单击''扫描'' |
| − | # | + | # 如果采集不满意,再次单击''扫描''按钮开始一个新的采集, 或单击''整合''按钮添加数据 |
{{Screenshot|Dental_3_5_wizAcquire.PNG}} | {{Screenshot|Dental_3_5_wizAcquire.PNG}} | ||
| − | === | + | ===打开直播=== |
| − | + | 可以打开摄像机的实时取景,通过点击{{Inline button|OpenLive.png}}在计算机的监视器查看扫描的进度 | |
| − | === | + | === 高级参数 === |
| − | + | 在向导过程中,采集策略是根据采集的不同元素种类自动选择的。 | |
| − | + | 有一些特定的情况下,可能有必要将扫描策略更改为非默认值。例如,如果用户需要扫描种植基台代替支台齿,最好是选择特定的基牙策略。同样,如果用户需要设计一个贴片:它不是支台齿默认的默认策略,但它可以在采集期间被选择。 | |
| − | + | 要改变策略,单击{{Inline button|Adv parameters.png}}按钮并从下拉选单中选择。 | |
| − | === | + | === 从参考复制 === |
| − | + | 有时,一个元素数据已经在另一个采集中扫描 | |
| − | {{Important| | + | {{Important|例如,颚部份健康齿和桥体部分的采集类似于整个颚的参考采集,支台齿除外,它将在一个单独的步骤中采集。}} |
| − | + | 在这些情况下,软件会显示现有的图像并自动删除部分已经扫描细节的部份。如果对于切割副本不满意,始终可以通过点击''从参考复制''重新复制整个图像或者开始新的采集。 | |
{{Screenshot|Dental_3_5_wizHealthyAcquire.PNG}} | {{Screenshot|Dental_3_5_wizHealthyAcquire.PNG}} | ||
| − | = | + | = 多代型采集 = |
| − | + | 采集多个代型或植体时,最好不要对每个组件做单一采集。<br /> | |
| − | + | 可以一次性采集多个对象。<br /> | |
| − | + | 只要确保对象的所有部分都是完全可见的,互相保持一个适当的距离,在模型支架或多代型支撑上。<br /> | |
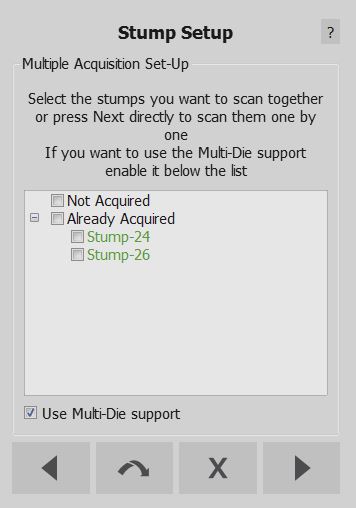
| − | + | 在这些情况下,软件将显示一个多采集设置步骤,其中可以选择要同时扫描的对象。 | |
| − | + | 此步骤将显示要与已采集项目一起扫描的所有对象列表。标志必须一起扫描对象的框,当扫描支台齿时,默认勾选对话框底部的'''使用多代型支撑'''选项,从而允许使用多代型支架。 | |
{{Screenshot|Dental_2_5_wizMultiStump.jpg}} | {{Screenshot|Dental_2_5_wizMultiStump.jpg}} | ||
| − | === | + | ===使用多代型=== |
| − | + | 如果多代型选项被选中,该软件将设置为代型的特定采集;图像会引导用户在多代型支架上定位代型。<br /> | |
| − | + | 采集完成后,软件会自动识别每个单独的代型,并返回到多采集步骤,以允许采集更多对象。 | |
{{Screenshot|Dental_2_5_wizMultiDieAcquisition.jpg}} | {{Screenshot|Dental_2_5_wizMultiDieAcquisition.jpg}} | ||
| − | === | + | ===不使用多代型=== |
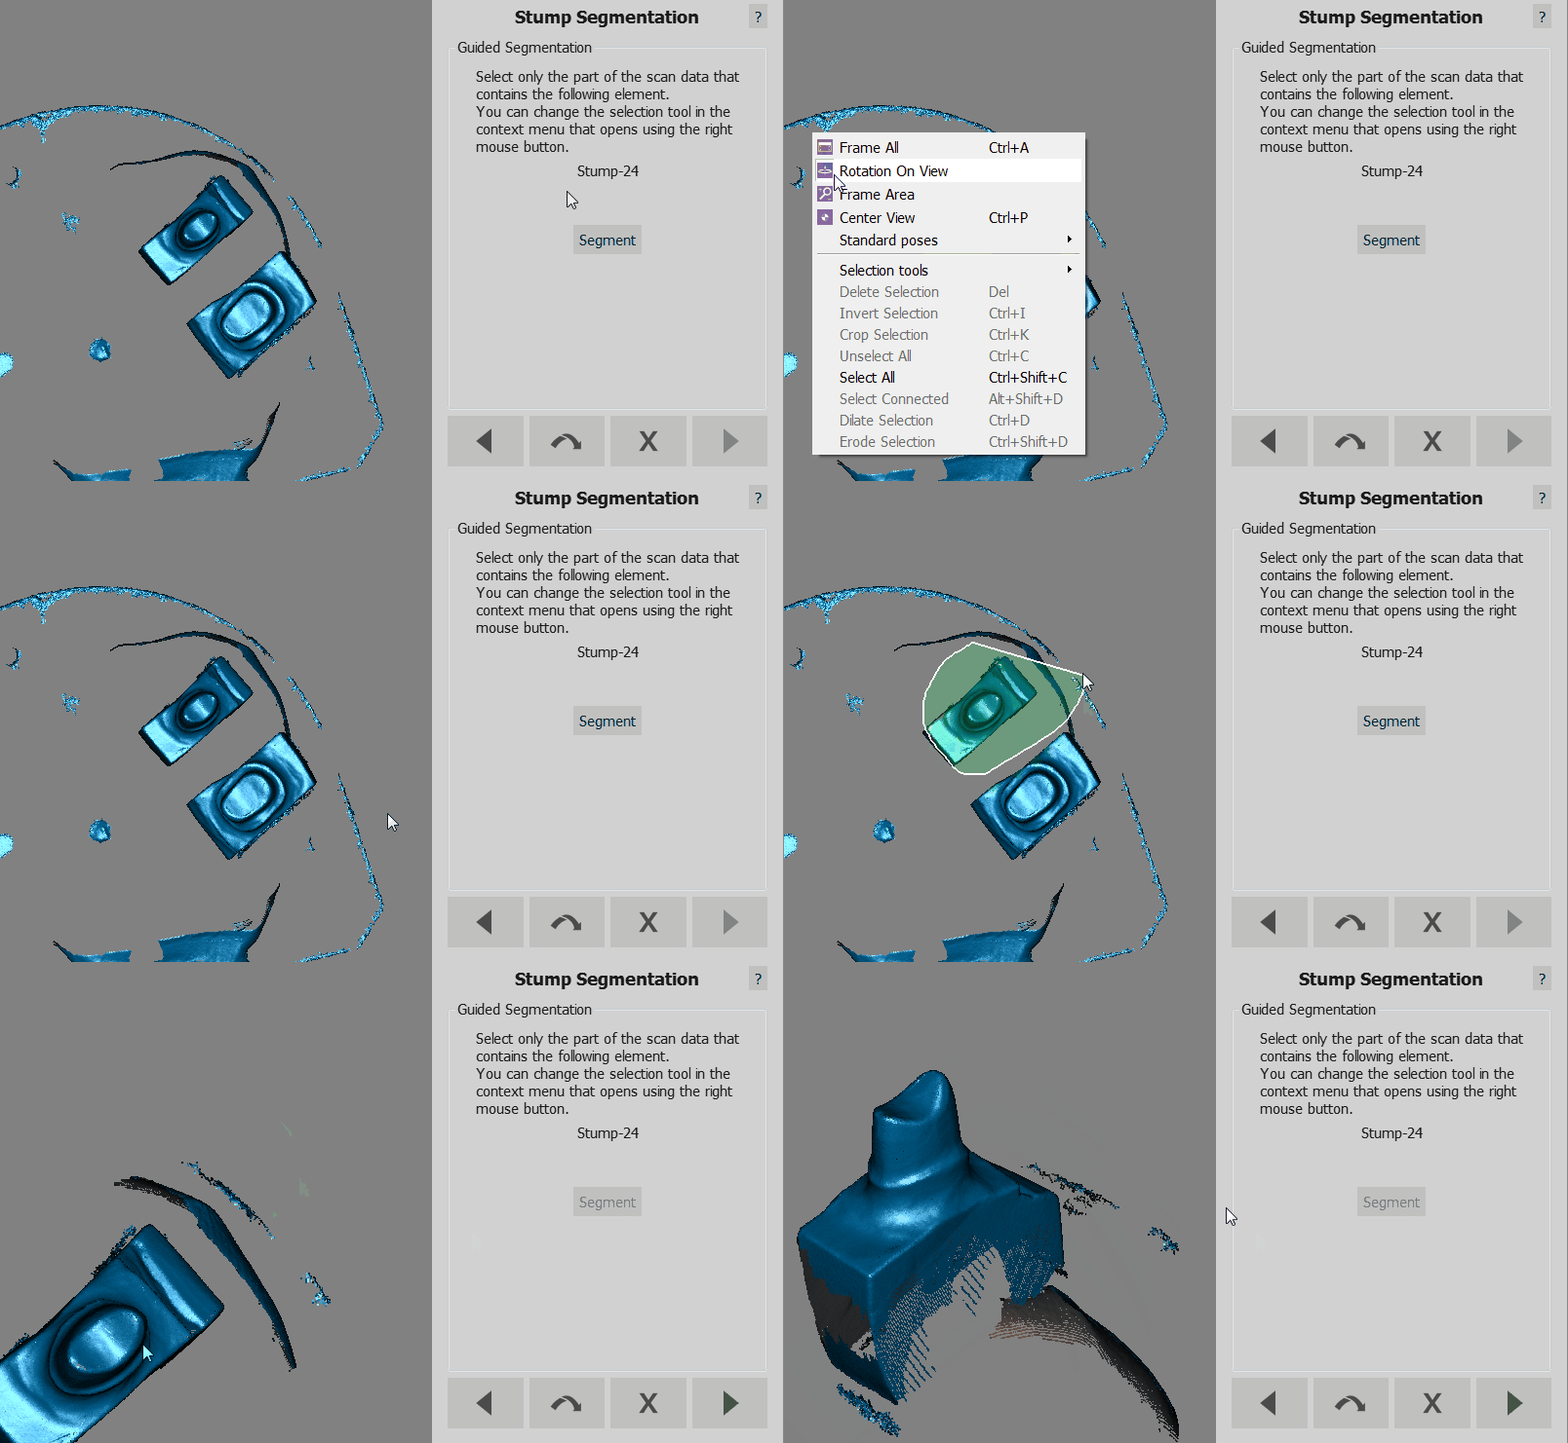
| − | + | 如果取消选择多代型,该软件将用下面的步骤采集对象,要用户手动识别每个对象。<br /> | |
| − | + | 具体的向导步骤会问询问需要识别哪个对象。用户需要: | |
| − | # | + | # 从向导页中阅读必须选择哪个对象 |
| − | # | + | # 使用 [[Man_DataEditing|选择工具]]选择特定对象 |
| − | # | + | # 点击'''分割'''按钮 |
| − | # | + | # 点击'''下一个'''按钮 |
| + | \ | ||
[[File:Dental_2_5_wizStumpSegment.gif]] | [[File:Dental_2_5_wizStumpSegment.gif]] | ||
| − | + | 识别所有对象后,该软件返回到多代型采集步骤。如果所有对象都已被采集,点击''下一步''继续执行分步向导 | |
{{Screenshot|Dental_2_5_wizMultiStump-after.jpg}} | {{Screenshot|Dental_2_5_wizMultiStump-after.jpg}} | ||
| − | = | + | = 整合 = |
| − | + | 采集后,通过单击'''整合'''按钮,[[Man_Acquisition#Integration|整合模式]]将被启动。 | |
{{Navigation|Wiz_Introduction|Wiz_BaseCutAndAutoCleaning}} | {{Navigation|Wiz_Introduction|Wiz_BaseCutAndAutoCleaning}} | ||
Latest revision as of 12:23, 1 August 2017
采集向导
在分步向导流程中,您可以:在一次扫描采集单个或多个对象,重新采集先前采集的对象,并整合所有这些采集。
单个对象
每采集一个元素,都会显示一个特定的向导屏幕:
- 被采集对象的名称
- 应扫描对象的简要说明
- 一个对象颜色选择器
- 一个扫描按钮以开始采集
- 一个整合按钮以开始整合之前扫描的对象
- 一个已对齐检查显示该对象是否已对齐项目的其余部分
遵循向导很容易:
- 阅读对象说明
- 把合适的对象置入扫描器内
- 单击扫描
- 如果采集不满意,再次单击扫描按钮开始一个新的采集, 或单击整合按钮添加数据
打开直播
可以打开摄像机的实时取景,通过点击![]() 在计算机的监视器查看扫描的进度
在计算机的监视器查看扫描的进度
高级参数
在向导过程中,采集策略是根据采集的不同元素种类自动选择的。
有一些特定的情况下,可能有必要将扫描策略更改为非默认值。例如,如果用户需要扫描种植基台代替支台齿,最好是选择特定的基牙策略。同样,如果用户需要设计一个贴片:它不是支台齿默认的默认策略,但它可以在采集期间被选择。
从参考复制
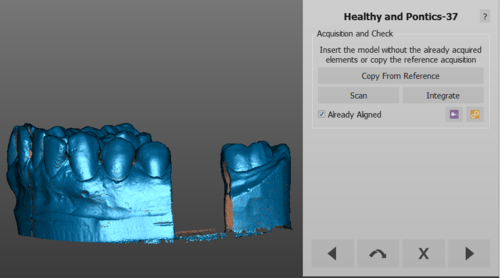
有时,一个元素数据已经在另一个采集中扫描
在这些情况下,软件会显示现有的图像并自动删除部分已经扫描细节的部份。如果对于切割副本不满意,始终可以通过点击从参考复制重新复制整个图像或者开始新的采集。
多代型采集
采集多个代型或植体时,最好不要对每个组件做单一采集。
可以一次性采集多个对象。
只要确保对象的所有部分都是完全可见的,互相保持一个适当的距离,在模型支架或多代型支撑上。
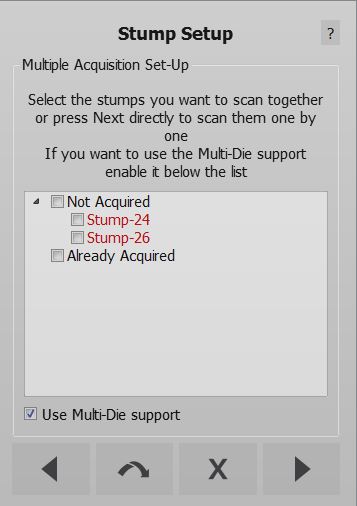
在这些情况下,软件将显示一个多采集设置步骤,其中可以选择要同时扫描的对象。
此步骤将显示要与已采集项目一起扫描的所有对象列表。标志必须一起扫描对象的框,当扫描支台齿时,默认勾选对话框底部的使用多代型支撑选项,从而允许使用多代型支架。
使用多代型
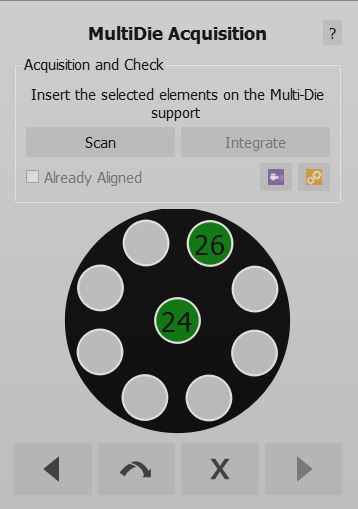
如果多代型选项被选中,该软件将设置为代型的特定采集;图像会引导用户在多代型支架上定位代型。
采集完成后,软件会自动识别每个单独的代型,并返回到多采集步骤,以允许采集更多对象。
不使用多代型
如果取消选择多代型,该软件将用下面的步骤采集对象,要用户手动识别每个对象。
具体的向导步骤会问询问需要识别哪个对象。用户需要:
- 从向导页中阅读必须选择哪个对象
- 使用 选择工具选择特定对象
- 点击分割按钮
- 点击下一个按钮
\
识别所有对象后,该软件返回到多代型采集步骤。如果所有对象都已被采集,点击下一步继续执行分步向导
整合
采集后,通过单击整合按钮,整合模式将被启动。
