Difference between revisions of "Wiz Acquisition/pt-br"
(Updating to match new version of source page) |
|||
| (11 intermediate revisions by 3 users not shown) | |||
| Line 23: | Line 23: | ||
# Se a aquisição não é satisfatória, clique novamente no botão '' Escanear '' para iniciar uma nova aquisição, ou o botão '' Integrar '' para adicionar dados | # Se a aquisição não é satisfatória, clique novamente no botão '' Escanear '' para iniciar uma nova aquisição, ou o botão '' Integrar '' para adicionar dados | ||
| − | {{Screenshot| | + | {{Screenshot|Dental_3_5_wizAcquire.PNG}} |
| + | |||
| + | === Open Live === | ||
| + | |||
| + | It is possible to open the live view of the cameras, by clickin on the {{Inline button|OpenLive.png}} to see the progress of the scanning in the monitor of the computer. | ||
| + | |||
| + | === Advanced Parameters === | ||
| + | |||
| + | During the wizard the acquisition strategy is selcted automatically depending on the kind of element to acquire. | ||
| + | |||
| + | There are some specific cases, however, in which it might be necessary to change the scanning strategy to a non default one. For instance, if the user needs to scan abutments instead of stumps, it would be best to select the specific abutment strategy. Same goes if the user needs to design a veneer: it is not a default strategy for stumps but it can be selected during acquisition. | ||
| + | |||
| + | To change strategy, click on the {{Inline button|StartServiceButton.jpg}} button and select it from the drop down menu. | ||
=== Copiar da Referência === | === Copiar da Referência === | ||
| Line 29: | Line 41: | ||
Às vezes, um elemento de dados já foi verificado durante uma outra aquisição. | Às vezes, um elemento de dados já foi verificado durante uma outra aquisição. | ||
| − | {{ | + | {{Important|Por exemplo, a aquisição das partes saudáveis e pônticos da arcada é semelhante à aquisição de referência de toda a arcada, exceto para os munhões, que vão ser adquiridos num passo separado.}} |
| − | |||
| − | |||
| − | + | In these cases, the software will show the existing image and automatically remove the parts already scanned in detail. It is always anyways possible to copy the whole image again by clicking ''Copy From Reference'' or to start a new acquisition if the cut copy is not satisfying. | |
| − | {{Screenshot| | + | {{Screenshot|Dental_3_5_wizHealthyAcquire.PNG}} |
= Multi Aquisição = | = Multi Aquisição = | ||
| − | + | Ao adquirir múltiplos munhões ou múltiplos implantes, é melhor não realizar uma aquisição única para cada elemento. <br /> | |
| − | + | É possível escanear diversos elementos de uma só vez. <br /> | |
| − | + | Apenas certifique-se de que os elementos sejam completamente visíveis em todas as suas partes e que estejam a uma distância suficiente, quer no suporte do modelo que no suporte Multi-Munhão. <br /> | |
| − | + | Nestes casos, o software irá mostrar uma etapa de configuração de Multi Aquisição onde é possível selecionar os elementos que serão escaneados no mesmo momento. | |
| − | This step will show a list of all the objects that have to be scanned together with the already acquired items. Flag the boxes of the objects that have to be scanned together and, when scanning stumps, flag | + | This step will show a list of all the objects that have to be scanned together with the already acquired items. Flag the boxes of the objects that have to be scanned together and, when scanning stumps,the flag '''Use Multi-Die support''' option on the bottom of the dialog will be checked by default to allow the use of the Multi-Die holder. |
{{Screenshot|Dental_2_5_wizMultiStump.jpg}} | {{Screenshot|Dental_2_5_wizMultiStump.jpg}} | ||
| Line 50: | Line 60: | ||
=== Com Multi-Munhão === | === Com Multi-Munhão === | ||
| − | + | Se a opção Multi-Munhão for selecionada, o software irá configurar uma aquisição específica para os munhões; uma imagem irá orientar o usuário a posicionar os munhões no suporte de Multi-Munhão. <br /> | |
| − | + | Após a aquisição, o software irá automaticamente reconhecer os munhões individuais e voltar ao Passo Multi-Aquisição para permitir a aquisição de elementos adicionais. | |
{{Screenshot|Dental_2_5_wizMultiDieAcquisition.jpg}} | {{Screenshot|Dental_2_5_wizMultiDieAcquisition.jpg}} | ||
| Line 57: | Line 67: | ||
=== Sem Multi-Munhão === | === Sem Multi-Munhão === | ||
| − | + | If the Multi-Die gets deselected, the software will acquire the objects and, in the following step, require the user to manually identify each object.<br /> | |
| − | + | A specific Wizard Step will ask which object has to be identified. The user has to: | |
| − | # | + | # Leia na página do assistente qual elemento tem que ser selecionado |
| − | # | + | # Selecione o objeto específico, usando o [[Man_DataEditing|Selection Tool]] |
| − | # | + | # Clique no botão'''Segmento''' |
| − | # | + | # Clique no botão '''Próximo''' |
[[File:Dental_2_5_wizStumpSegment.gif]] | [[File:Dental_2_5_wizStumpSegment.gif]] | ||
| Line 73: | Line 83: | ||
= Integração = | = Integração = | ||
| − | + | Clicando no botão '''Integrar''' após uma aquisição, o [[Man_Acquisition#Integration|Integration| modo de integração]] vai iniciar. | |
{{Navigation|Wiz_Introduction|Wiz_BaseCutAndAutoCleaning}} | {{Navigation|Wiz_Introduction|Wiz_BaseCutAndAutoCleaning}} | ||
Latest revision as of 12:30, 22 June 2016
Contents
Aquisição Assistida
Durante o Assistente passo-a-passo, é possível adquirir elementos individuais, vários elementos em um escaneamento, re-adquirir um objeto previamente adquiridos e integrar todas essas aquisições.
Elemento único
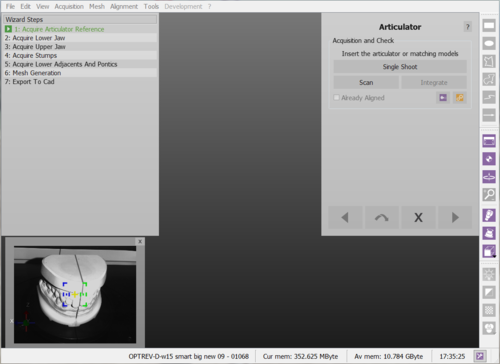
Cada vez que um elemento tem de ser adquirido, uma tela de assistência específica mostrará:
- O nome do objeto a ser adquirido
- Uma breve descrição do que deve ser escaneado
- Um seletor para a Cor do Objeto
- Um botão de "escaneamento" para iniciar a aquisição
- Um botão Integrar para iniciar a integração de um objeto previamente adquirido
- Uma verificação Já Alinhados que mostra se este elemento já está alinhado com o resto do projeto
É muito fácil de seguir o assistente:
- Leia a descrição do elemento
- Coloque o elemento certo dentro do escaner
- Clique em Escanear
- Se a aquisição não é satisfatória, clique novamente no botão Escanear para iniciar uma nova aquisição, ou o botão Integrar para adicionar dados
Open Live
It is possible to open the live view of the cameras, by clickin on the ![]() to see the progress of the scanning in the monitor of the computer.
to see the progress of the scanning in the monitor of the computer.
Advanced Parameters
During the wizard the acquisition strategy is selcted automatically depending on the kind of element to acquire.
There are some specific cases, however, in which it might be necessary to change the scanning strategy to a non default one. For instance, if the user needs to scan abutments instead of stumps, it would be best to select the specific abutment strategy. Same goes if the user needs to design a veneer: it is not a default strategy for stumps but it can be selected during acquisition.
To change strategy, click on the ![]() button and select it from the drop down menu.
button and select it from the drop down menu.
Copiar da Referência
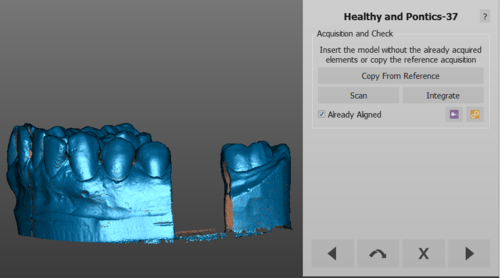
Às vezes, um elemento de dados já foi verificado durante uma outra aquisição.
In these cases, the software will show the existing image and automatically remove the parts already scanned in detail. It is always anyways possible to copy the whole image again by clicking Copy From Reference or to start a new acquisition if the cut copy is not satisfying.
Multi Aquisição
Ao adquirir múltiplos munhões ou múltiplos implantes, é melhor não realizar uma aquisição única para cada elemento.
É possível escanear diversos elementos de uma só vez.
Apenas certifique-se de que os elementos sejam completamente visíveis em todas as suas partes e que estejam a uma distância suficiente, quer no suporte do modelo que no suporte Multi-Munhão.
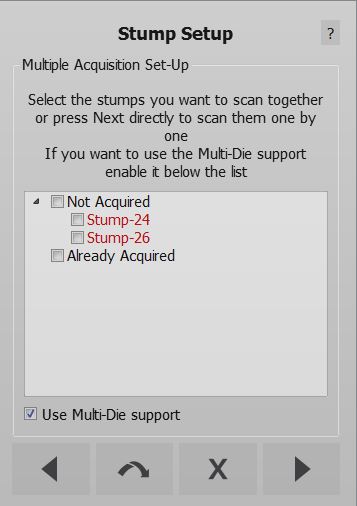
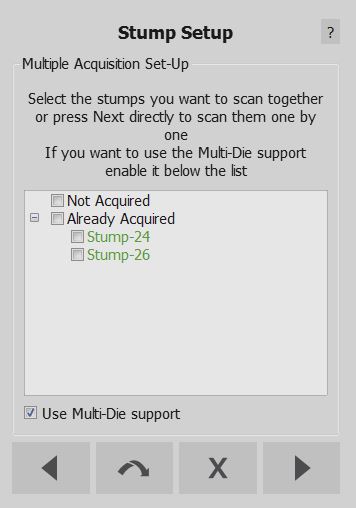
Nestes casos, o software irá mostrar uma etapa de configuração de Multi Aquisição onde é possível selecionar os elementos que serão escaneados no mesmo momento.
This step will show a list of all the objects that have to be scanned together with the already acquired items. Flag the boxes of the objects that have to be scanned together and, when scanning stumps,the flag Use Multi-Die support option on the bottom of the dialog will be checked by default to allow the use of the Multi-Die holder.
Com Multi-Munhão
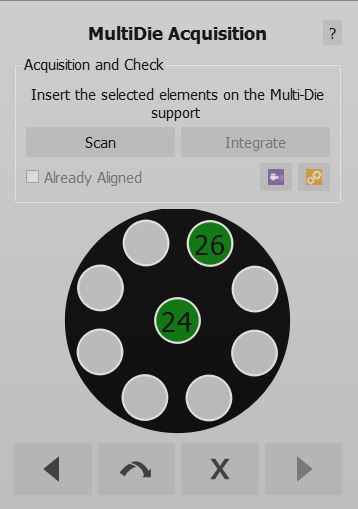
Se a opção Multi-Munhão for selecionada, o software irá configurar uma aquisição específica para os munhões; uma imagem irá orientar o usuário a posicionar os munhões no suporte de Multi-Munhão.
Após a aquisição, o software irá automaticamente reconhecer os munhões individuais e voltar ao Passo Multi-Aquisição para permitir a aquisição de elementos adicionais.
Sem Multi-Munhão
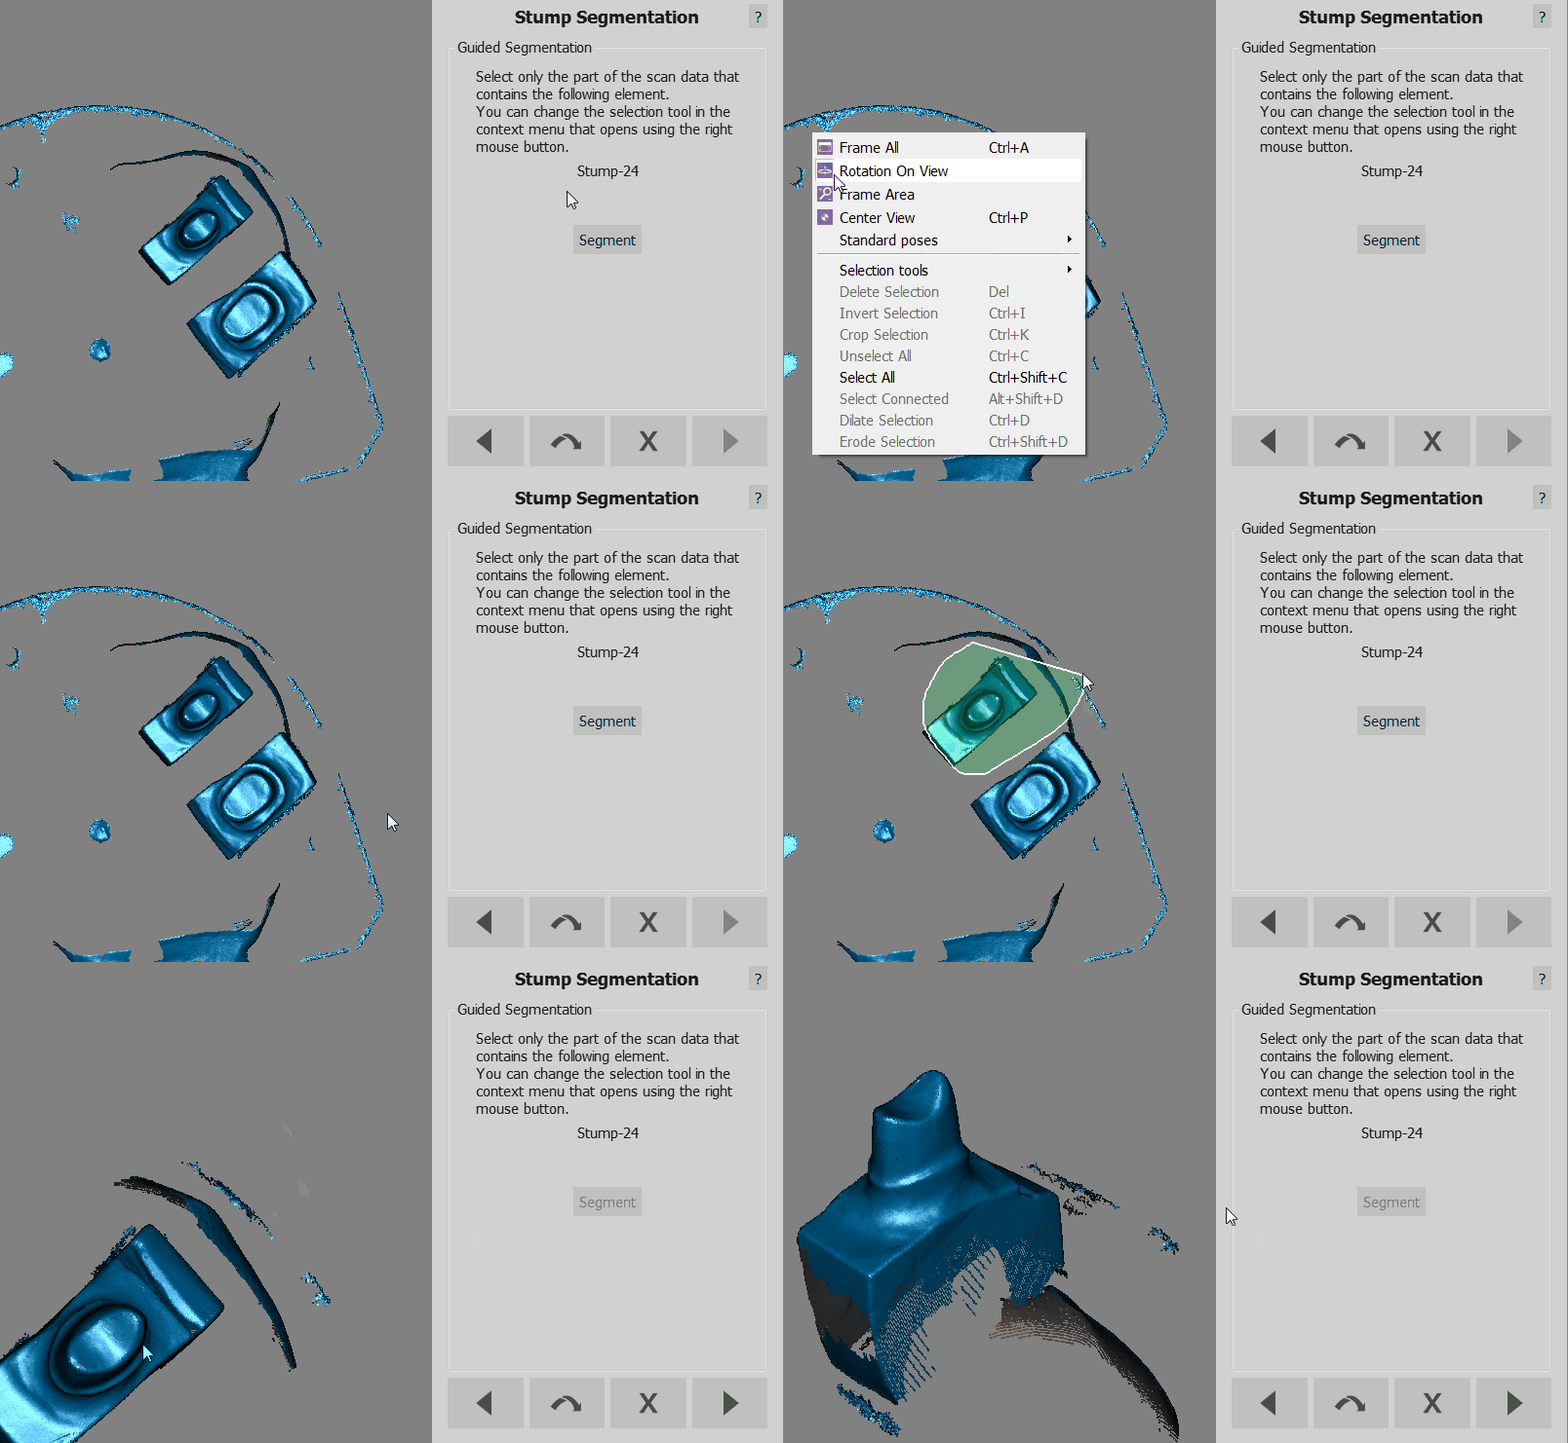
If the Multi-Die gets deselected, the software will acquire the objects and, in the following step, require the user to manually identify each object.
A specific Wizard Step will ask which object has to be identified. The user has to:
- Leia na página do assistente qual elemento tem que ser selecionado
- Selecione o objeto específico, usando o Selection Tool
- Clique no botãoSegmento
- Clique no botão Próximo
Quando todos os objectos são identificados, o software retorna ao passo Multi-Aquisição. Se todos os elementos já foram adquiridos, clique em Próximo para continuar com o assistente passo-a-passo.
Integração
Clicando no botão Integrar após uma aquisição, o Integration| modo de integração vai iniciar.
