Difference between revisions of "Interaction/de"
(Created page with "* {{Inline button|Mouse_middle.png}} + {{Inline button|Mouse_right.png}} or {{Inline button|Key_alt.png}} + {{Inline button|Mouse_right.png}}: Panoramaschwenk der Kamera in 2D...") |
(Created page with "Die Software verfügt über einen Alternativen Interaktionsmodus, der die Funktionen der mittleren und rechten Maustaste vertauscht, um die Interaktion anderer CAD-Softwares z...") |
||
| Line 29: | Line 29: | ||
* {{Inline button|Key_shift.png}} + Zahl von 1 bis 7 : wandelt die 3-D Ansicht in eine der Standardansichten um (Bsp.: Vorderansicht, Hinteransicht, von oben, usw.) | * {{Inline button|Key_shift.png}} + Zahl von 1 bis 7 : wandelt die 3-D Ansicht in eine der Standardansichten um (Bsp.: Vorderansicht, Hinteransicht, von oben, usw.) | ||
| − | + | Die Software verfügt über einen Alternativen Interaktionsmodus, der die Funktionen der mittleren und rechten Maustaste vertauscht, um die Interaktion anderer CAD-Softwares zu simulieren. | |
=== Context Menu and View Menu === | === Context Menu and View Menu === | ||
Revision as of 10:47, 25 January 2016
Contents
Hauptmaske
Das untere Bild zeigt ein Beispiel von 3D-Interaktion auf einem, in OpticalRevEngDental ausgewählten Mesh.
Es ist möglich, mittels Maus und Tastatur, dem Kontextmenü, dem Ansichtsmenü und der Ansichtsleiste mit der 3D-Ansicht zu interagieren.
Interaktion mittels Maus
Der Nutzer kann mittels Maus oder durch bestimmte Funktionen des Ansichtsmenüs, der Ansichtsleiste und des Kontektmenüs mit der Ausrichtung des 3D-Objektes interagieren.
Hier eine Liste mit den möglichen Maus-Tastatur-Kombinationen:
-
 +
+  or
or  +
+  : Panoramaschwenk der Kamera in 2D
 -
 : freie Rotation der Kamera um das 3D-Objekt
 -
 +
+  : Rotation der Kamera um die Y-Achse der 3D-Ansicht
 -
 +
+  : Rotation der Kamera um die X-Achse der 3D-Ansicht
 -
 +
+  : Rotation der Kamera um die Z-Achse der 3D-Ansicht
 -
 : Zoomänderung
 -
 : Öffnen des Kontextmenüs
 -
 +
+  : Verschiebung der Lichtquelle auf eine andere Position in der 3D-Ansicht
 -
 : Anwendung der aktiven Funktion (Bsp.: Rechteckige Auswahl, Löcher füllen, usw.)
 -
 +
+  : Umstellung der aktiven Funktion, wenn möglich (Bsp.: Punkteauswahl aufheben statt Punkte auswählen, usw.)
 -
 + Zahl von 1 bis 7 : wandelt die 3-D Ansicht in eine der Standardansichten um (Bsp.: Vorderansicht, Hinteransicht, von oben, usw.)
Die Software verfügt über einen Alternativen Interaktionsmodus, der die Funktionen der mittleren und rechten Maustaste vertauscht, um die Interaktion anderer CAD-Softwares zu simulieren.
Context Menu and View Menu
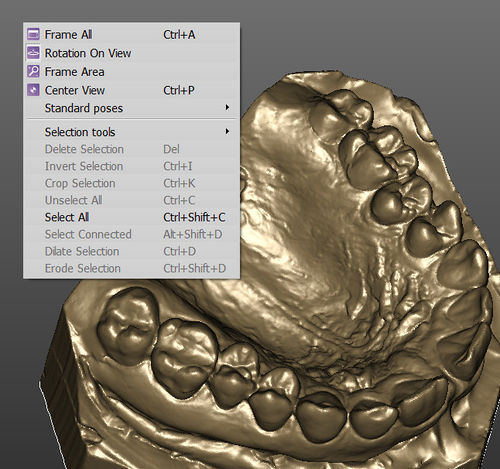
The view menu and the 3D View context menu contain some tools that can be used to interact with the 3D View.
- Frame All (
 + A) : the 3D camera will move to show, on the screen, all the current selected 3D Objects
 - Rotation On View : if this option is enabled, the rotation will ignore the current selected 3D Objects; if it is disabled, the center of the rotation will be the baricenter of the selected 3D Objects
- Area Frame Tool: this tool allows to draw with
 a rectangle. The rectangle will become the new camera view.
 - Center View (
 + P) : the currently selected 3D Objects are moved at the center of the screen without changing their Zoom
 - Standard Poses : sub-menu to apply default 3D views:
The context menu contains other tools described in the Data Editing page.
Data Information Window
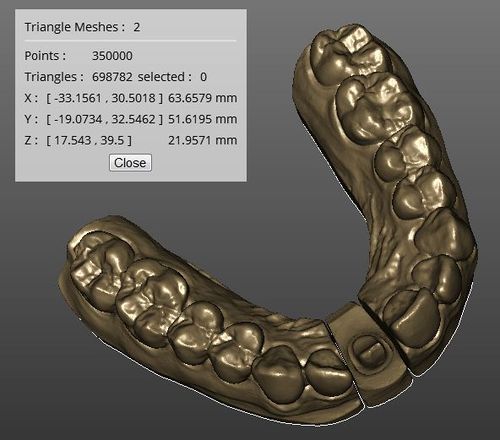
In the view menu, it is possible to enable the Data Information Window with the View Data Window (![]() +
+ ![]() + I) action.
+ I) action.
This window provides some information about the current selected 3D Objects.
- Description: a line that describes the type of the currently selected objects (E.g. Triangle Mesh: 2, Range Images: 6, etc.)
- Points: the number of points of the currently selected objects
- Faces: the number of faces, available only for triangle meshes
- Selected: the number of selected points/faces of the currently selected objects
- Size and Position: the minimum/maximum coordinates of the volume of the currently selected objects, and their size in every direction


